I was staring at the shared kitchen at 1 a.m., surrounded by abandoned air fryers and broken blenders, and realized something strange: nobody could cook, but everyone had gadgets.
At some point I stopped asking “What should I cook?” and started asking “What is the minimum gear I actually need to not live on instant noodles?”
The short answer: you only need five things to run a legit student kitchen. Get a good knife, a decent cutting board, one solid pan, one solid pot, and a way to measure heat and time. Everything else is optional, aesthetic, or just taking up your roommate’s shelf space.
If buying a tool will not make you cook more often, you probably do not need it.
Why student kitchens are full of junk but short on real tools
At some point during first year, a strange kitchen economy appears in every dorm or student apartment:
- Someone owns three spatulas and no pan that sits flat.
- Someone else has a rice cooker, an air fryer, and a waffle iron, but cuts vegetables with a butter knife.
- There is a blender that nobody admits to owning, with a faint smell of old protein powder.
I realized during a break between lectures that this is basically the startup version of “overbuilding the product and ignoring the core feature.”
We buy gadgets that promise shortcuts, but skip the boring fundamentals that actually let us cook anything decent, consistently, and safely.
So before getting to the five tools, here is the core idea that shaped this list:
The best kitchen setup is the one that removes excuses, not the one that adds features.
Excuses look like this:
- “I cannot cook that, I do not have the right pan.”
- “I do not want to cut vegetables, this knife is terrible.”
- “I do not know how hot the pan is, I always burn things.”
Once you strip the gear down to the minimum, those excuses get harder to say with a straight face.
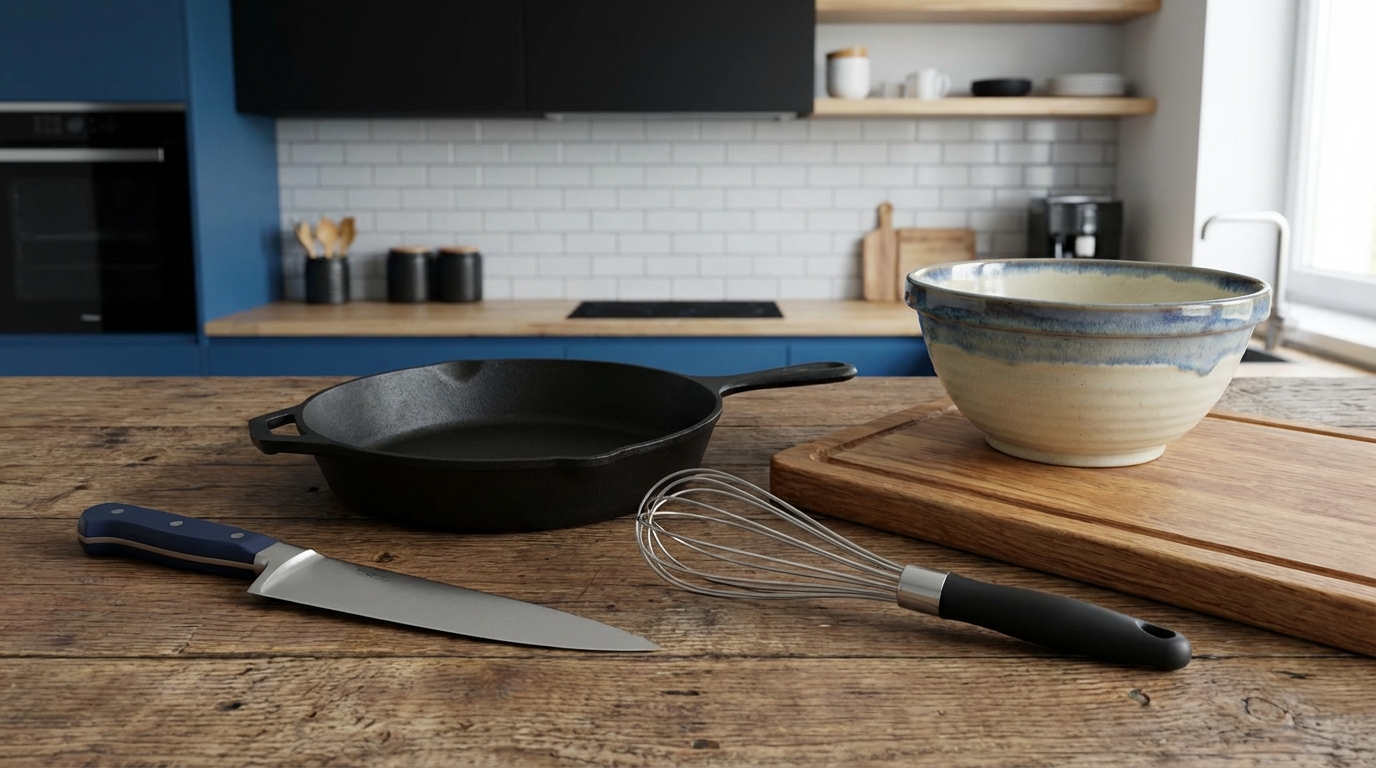
The 5 tools that actually matter
Here is the high-level list before we zoom into each one:
- A real chef’s knife (and a way to keep it sharp)
- A stable cutting board
- One heavy pan you trust
- One medium pot with a lid
- A heat and time combo: basic stove access + timer (phone) + optional thermometer
If you have these five categories covered, you can cook:
- Stir-fries
- Pasta, noodles, and sauces
- Soups and stews
- Eggs in every form
- Most one-pan / one-pot meals you see on social media
Now let’s go tool by tool, from most to least underrated.
1. The chef’s knife: your actual “founder tool”
I used to think knives were just… knives. Then I tried chopping an onion with a sharp chef’s knife after a semester of using a dull, mystery-brand blade from the discount bin. It felt like switching from typing an essay on my phone to using a real keyboard.
If you upgrade one thing, upgrade the knife.
What you actually need in a knife
Ignore influencer knife sets with 12 pieces and fancy blocks. For a student kitchen, one main knife is enough:
| Feature | What to look for | Why it matters |
|---|---|---|
| Type | Chef’s knife or “gyuto” | Versatile: vegetables, meat, herbs, fruit |
| Length | 8 inches (20 cm) for most people | Long enough for big jobs, not scary to handle |
| Handle | Feels secure, no sharp edges, does not slip | Comfort = less effort, more control |
| Price range | Mid-range, not ultra cheap, not luxury | Spend once, keep it for years |
If a store lets you hold sample knives, do that. The right knife should feel like a slightly heavy pen, not a sword.
How much should a student spend?
This is where people overreact in both directions.
Some say, “I am a student, I will just buy the cheapest option.”
Others go into a rabbit hole of steel types and end up with a knife that costs more than a month of groceries.
A practical student range:
- Low: The very bottom tier, under 15, often feels bad from day one and gets worse.
- Sweet spot: Around 25 to 60, from a reputable brand, is enough for years of normal use.
- Overkill: Above 80 is usually for people who have very specific preferences.
If you cook multiple times a week, that “sweet spot” knife will pay off both in time saved and in food that is cut evenly and cooks better.
Sharpening: the boring habit that makes the difference
A slightly average knife that is sharp beats an expensive dull one. Every time.
You have two realistic student options:
- Pull-through sharpener: You pull the knife through a slot a few times.
- Whetstone: A stone you soak and drag the blade over at an angle.
If you are new, start with a pull-through sharpener. It is not perfect, but it is better than nothing and takes 30 seconds.
Ideal student routine:
- Quick sharpening every 2 to 3 weeks if you cook often.
- Never store the knife loose in a drawer where it hits metal.
- Do not cut on glass or plates. Only use proper boards.
A sharp knife is not “dangerous”; it is safer because it does not slip.
Why the knife matters for student life
A good knife removes friction:
- Chopping goes faster, so cooking feels less like a chore.
- You are more likely to buy real vegetables instead of only pre-cut mixes.
- You can cook for friends without spending an hour on prep.
It is like having a laptop that boots quickly. You suddenly want to start more projects.
2. The cutting board: the “invisible” tool that makes cooking calmer
Nobody brags about their cutting board, but it decides whether your cooking session feels calm or chaotic.
I realized this during a rushed pre-exam meal when my small, sliding board shot a tomato onto the floor. That moment convinced me that a proper board is not a luxury. It is damage control.
What kind of board actually works in a dorm
Here is the tradeoff in simple form:
| Material | Pros | Cons | Good for students? |
|---|---|---|---|
| Plastic | Light, cheap, dishwasher safe (if you have one) | Can get deep grooves, looks ugly over time | Yes, especially as a starter board |
| Wood | Gentle on knives, stable, looks nice | Heavier, needs hand washing and drying | Yes, if you will care for it |
| Bamboo | Light, hard surface, stays flat | Can be slightly harder on blades | Decent compromise |
For a shared kitchen, I like one medium to large plastic board. It is easy to wash after someone else leaves it questionable.
Size and stability: bigger and non-slip
Key rule: small boards create big messes.
Look for:
- Size around 30 x 40 cm (12 x 16 inches) or larger if you have space.
- Non-slip edges or feet.
If the board does not have non-slip features, fix it yourself:
- Put a damp paper towel or a thin cloth under the board.
- Instant stability, no sliding, less risk.
Stability is underrated. A steady board plus a sharp knife feels like “easy mode” for cooking.
Do you need multiple boards?
For student life, you can survive with one board if you are smart about washing and timing:
- Cut vegetables and bread first.
- Cut raw meat last, then wash the board with hot water and soap.
If you cook meat often or share the kitchen with people who are not careful, then two boards can help:
- One for “everything else.”
- One dedicated to raw meat and fish.
Color-coded plastic boards can help roommates get the hint.
3. The one pan that replaces five gadgets
About halfway through the semester, I realized I could fry eggs in a pan, cook vegetables in a pan, reheat leftovers in a pan, and even finish some pasta dishes in a pan. That made one thing very clear:
A single good pan silently replaces the air fryer, sandwich press, and half your random appliances.
Pan size and shape: what actually works in a student kitchen
You want a pan that can:
- Cook for 1 to 3 people.
- Handle both quick frying and gentle simmering.
- Fit on the small burners that many student housing places give you.
General sweet spot:
- Diameter: 24 to 28 cm (9.5 to 11 inches).
- Shape: Straight or slightly sloped sides, not super shallow.
Too small and food spills. Too big and only the center heats properly on a small stove.
Nonstick vs stainless vs cast iron
This is where students often get lost. Here is the practical breakdown:
| Type | Best for | Pros | Cons | Student verdict |
|---|---|---|---|---|
| Nonstick | Eggs, pancakes, low-stress everyday cooking | No sticking, easy cleanup, low oil | Coating wears out, hates high heat and metal tools | Great starter pan if you treat it gently |
| Stainless steel | Searing, sauces, serious practice | Durable, oven-safe, no coating to damage | Food sticks if you do not manage heat well | Good if you want to improve your skill |
| Cast iron | High heat, crisp surfaces, “forever pan” | Holds heat, nearly indestructible | Heavy, needs seasoning, slower to heat | Great if you are willing to maintain it |
If you just want something forgiving and simple, a mid-range nonstick pan is the least stressful option.
If you are geeky about cooking and do not mind a learning curve, a stainless steel or cast iron pan can be a good long-term choice.
How to not kill a nonstick pan in 3 months
Common student mistakes:
- Heating an empty nonstick pan on high until it smokes.
- Using metal spatulas that scratch the coating.
- Putting a screaming-hot pan straight under cold water.
Better habits:
- Use medium heat for most cooking.
- Use wood, silicone, or plastic utensils.
- Let the pan cool slightly before washing.
If you respect the pan, it will stay nonstick longer and save you a lot of scrubbing.
What you can realistically cook with one pan
With just one good pan, you can handle:
- Scrambled, fried, and omelet-style eggs.
- Stir-fries with vegetables and protein.
- Pan-cooked frozen dumplings.
- Quick one-pan pasta (starting in the pot, finishing in the pan).
- Reheating rice and leftovers without them turning soggy.
This is why I sometimes call the pan “the main product,” while the pot is “the supporting service.”
4. The medium pot: quiet workhorse of student cooking
I did not respect the pot at first. It just felt like a container for boiling water. Then exam season hit, and I started living on soups, pasta, and one-pot meals. Suddenly the pot was running daily, like a server under load.
If the pan is for quick wins, the pot is for steady, low-stress meals you can repeat every week.
Size and features that matter
Student kitchens do not need a huge stockpot. You want something like:
- Volume: 3 to 4 liters (roughly 3 to 4 quarts).
- Shape: Medium height so it can handle soups and pasta.
- Material: Stainless steel with a reasonably thick base.
A glass lid is very helpful. You can see what is going on without lifting the lid and losing heat.
Single pot, many tasks
With one solid pot and your pan, your menu expands a lot.
Here is what a single pot can regularly handle:
- Boiling pasta, noodles, or potatoes.
- Cooking rice (with a bit of practice).
- Making soups with vegetables, beans, or lentils.
- Simmering basic sauces.
- Cooking oats or other hot breakfasts.
If you cook for two or three people regularly, that 3 to 4 liter size gives you enough volume without taking up the entire stove.
Why you do not need a separate rice cooker
I know the rice cooker fans will disagree here, but for a lot of student kitchens, a separate rice cooker is overkill.
The argument for skipping it:
- You already own a pot.
- Stoves are already there and paid for.
- The rice-cooker “magic” is mostly about keeping it warm and preventing burning, which can be learned with basic timing and ratios.
If you eat rice every single day and you have space, a rice cooker can be nice. But it is not on the “must-have” list. The pot already does the job.
5. Heat and time: the invisible tools
This last category feels almost too obvious, but it is the place where a lot of beginner mistakes live.
I realized during a rushed dinner between club meetings that my real problem was not the recipe. It was that I had no sense of timing. I would guess things like “cook for a while” and then either undercook or burn them.
People say they cannot cook, when they really mean they cannot yet judge heat and time.
You need three simple things:
- Some kind of stove.
- A way to measure time.
- Optionally, a way to check temperature for some foods.
Stove: electric, gas, or portable
Most student kitchens give you one of these:
- Electric coil or glass-ceramic stove.
- Gas stove.
- Portable induction or hot plate (in more limited setups).
You do not need the “perfect” stove. You just need to learn the tendencies of the one you have.
Simple approach:
- Pick one burner and make it your default.
- Learn what low, medium, and high look and feel like on that specific burner.
- Repeat many meals on that burner until it feels predictable.
Think of it like getting used to one laptop keyboard. Muscle memory builds faster when you stick to one setup.
Timer: your cheapest upgrade
Your phone is your timer. Use it shamelessly.
Examples of when a timer saves you:
- Pasta: check 1 to 2 minutes before the package time so you can choose the texture.
- Rice or grains: leave it covered for the full resting time instead of guessing.
- Frying or baking: remember to flip or stir before one side burns.
This sounds trivial, but once you start treating “5 minutes” as a fixed number instead of “vague period,” your cooking suddenly feels much more reliable.
Thermometer: optional but very useful
A small digital thermometer is not strictly part of the “essential 5” list, but it is close. It solves three stress points:
- You know when chicken or meat is safely cooked.
- You can repeat the same steak or chicken breast result by aiming for the same internal temperature.
- You stop cutting things open constantly “just to check.”
If your budget is tight, skip this at first. If you are nervous about undercooking meat, a thermometer can remove that anxiety quickly.
Why everything else is “nice to have”
At this point a fair question is: where do things like spatulas, bowls, and strainers fit?
Short answer: they matter, but they are accessories to the 5 core tools, not equal to them.
Here is a quick breakdown.
Tools that are useful but not core
- Spatula or wooden spoon: Cheap, handy, but easy to share or replace.
- Tongs: Very nice for turning food and handling hot things, especially with a pan.
- Strainer or colander: Helps with pasta and washing vegetables.
- Mixing bowl: Useful for salads, batter, marinating, etc.
- Measuring cups and spoons: Good for baking and for learning basic recipes.
You will probably collect these slowly and almost accidentally over a semester or two.
Gadgets that pretend to be essential
There is a pattern here. A lot of gadgets promise to make one thing easier, but at the price of space, cleaning, and money.
Examples:
- Garlic press vs simply learning to chop garlic with a knife.
- Egg cooker vs boiling eggs in your pot.
- Single-use slicers vs careful knife work on a big board.
Are these evil? No. They can be helpful if you have a specific need or disability, or if you cook one thing so often that the gadget pays off.
But in a small student kitchen, they quickly turn into clutter.
If a gadget replaces 5 minutes of learning with 5 years of storage, it is probably not worth it.
How to actually build your 5-tool setup on a student budget
This all sounds good in theory, but it bumps into reality: money, roommates, and limited space.
I treat the kitchen almost like a scrappy startup. Do the minimum that gets you from “idea” to “something that works every week.”
Priority order for buying
If you are starting from zero, this order works well:
- Knife: You need a way to cut food safely and properly.
- Cutting board: Without this, the good knife is annoying to use.
- Pan: This opens most fast meals.
- Pot: This unlocks pasta, soups, and a wider range.
- Timer / thermometer: Your phone acts as a starter timer; thermometer is optional.
You can stack the purchases across months instead of one big hit.
Where to save and where not to
From watching roommates and my own mistakes, here is the pattern:
- Do not go ultra cheap on the knife or pan. You will end up buying again.
- Spend less on the board and pot. Mid-range is fine.
- Buy second-hand when it is safe. Pots and pans can often be bought used, but be more careful with knives and nonstick coatings.
If you split costs with roommates, at least define ownership clearly:
- Label things subtly.
- Agree on rules for cleaning and storage.
Student kitchens break down when “everyone uses everything” and nobody feels responsible.
What you can actually cook with only these 5 tools
This is the fun part. The theory is nice, but what does a week of cooking look like with just these tools?
Imagine a basic setup:
- 8 inch chef’s knife
- Plastic or wooden cutting board
- 26 cm nonstick pan
- 3.5 liter stainless pot with lid
- Stove + phone timer
You can easily cover:
Breakfasts
- Scrambled eggs with chopped vegetables (knife + board + pan).
- Oats cooked in the pot, with fruit cut on the board.
- Fried eggs and toast, with some quick pan-fried tomatoes.
Lunches and dinners
- Pasta with a basic tomato or garlic-olive oil sauce (pot + pan if you want to sauté toppings).
- One-pan stir-fries over rice or noodles (pan + pot for the rice or noodles).
- Soups with vegetables, beans, or lentils (pot does everything, board + knife for prep).
- Simple curry-style dishes with chickpeas or chicken (pot or pan, depending on volume).
Batch cooking
If you are juggling projects, clubs, or exams, batch cooking suddenly makes sense. With only the 5 core tools you can:
- Make a big pot of soup or stew on Sunday.
- Cook a lot of rice in the pot and pan-fry it with vegetables the next day.
- Roast-like dishes on the stove using the pan (for example, sear, then cook covered on lower heat).
This is enough to support a weekly routine that feels stable, cheap, and not repetitive to the point of boredom.
The mindset shift: from “fancy gear” to “repeatable system”
There was a moment, halfway through a busy semester, when I was chopping onions for the fifth time that week. I realized I was not thinking about “how to chop an onion” anymore. My hands just knew what to do with the knife and board.
The tools had faded into the background. That is the real win.
The goal is not to own impressive tools. The goal is to forget about the tools because they always work.
Once the 5 essentials are locked in and familiar:
- You stop blaming the kitchen when food goes wrong.
- You start noticing patterns in heat, time, and ingredients.
- You can invite friends over without panic, because your setup is predictable.
That is the point where the student kitchen stops being chaos and starts feeling like a quiet little lab for experiments you actually want to run.
