At some point in the semester I realized my entire room looked like the “before” photo on a home makeover show: random hand-me-downs, flatpack pieces, and that one suspicious chair from Facebook Marketplace. The budget was real, but so was the urge to fix it.
TL;DR: You can turn cheap or free furniture into good-looking, actually-functional decor with a student budget by focusing on three things: picking the right pieces (solid structure first), using low-cost materials that give a big visual upgrade (paint, fabric, hardware), and planning each project so you spend more time thinking than buying. Upcycling is less about being “crafty” and more about problem solving with constraints.
What “Upcycling” Furniture Really Means For Students
I used to think upcycling meant being an art genius with a Pinterest board and a full workshop. Then I watched a friend turn a damaged coffee table into a bench with one can of paint and a cushion, and I had to update my mental model.
Upcycling furniture on a student budget is simply this: taking something structurally decent, and improving how it looks or works, using minimal money and basic tools.
It is not about perfection. It is about trade-offs:
– You trade money for time.
– You trade fancy tools for careful planning.
– You trade perfect finishes for smart design choices.
Why Upcycling Works So Well In Student Life
There are three reasons this hits especially hard on campus:
| Factor | Student Reality | Upcycling Advantage |
|---|---|---|
| Money | Rent, food, fees, repeat | Big visual change for small cost |
| Time | Odd pockets of free hours | Projects can be broken into 1-2 hour chunks |
| Space | Tiny rooms, shared flats | Furnishings that double as storage and decor |
Upcycling is also sneaky practice for startup thinking. You have constraints, you prototype, you test, you fix what failed. The furniture just makes the feedback very visible when a shelf collapses at 2 a.m.
Finding Furniture Worth Saving (And What To Avoid)
The biggest mistake I made at first was saying “yes” to every free chair that appeared in a group chat. Then I learned: not all free things are a bargain.
Where To Source Student-Friendly Pieces
- Campus move-out season: People leave perfectly usable desks and shelves next to dumpsters when they graduate. Ask housing if there is a “free corner” or donation area.
- Facebook groups & local marketplaces: Search for “free,” “must go,” or “collection only.” Sort by newest.
- Thrift shops & charity shops: Look in the furniture corner, not just decor. Ask if they have a back room with overflow.
- Family garages and storage: That old side table your relative forgot about might be solid wood under the dust.
- On-street finds: In many cities, people leave out furniture with an unspoken “take me” policy. If in doubt, knock and ask.
Rule 1: Structure first, surface second. Scratches are fine. Wobbly legs and broken frames are not worth it on a student timeline.
Quick Checklist: Is This Piece Worth Upcycling?
When you see a potential project, ask:
- Is it stable? Sit on it, lean on it, nudge it. If it creaks like it is writing a horror soundtrack, skip it.
- Is it real wood or sturdy metal? Solid wood and thick metal survive sanding and screws. Flimsy particle board chips easily.
- Any signs of pests or mold? Check under, inside, and behind. If yes, walk away. No decor project beats health.
- Does it roughly fit your room? Measure your available space on your phone notes. No amount of paint fixes a desk that blocks the door.
- Can 1-2 people carry it? You do not want to bribe four friends every time you move housing.
If at least four of those answers are positive, then the piece is probably worth your effort.
Budget Planning: How Little Can You Spend And Still Get A Glow Up?
During one studio break I did the math and realized I had spent more money on impulse decor items than on actual functional pieces. A candle collection does not make a room livable.
Treat your room like a tiny product you are building: define constraints, budget, and “features” before you buy a single can of paint.
Setting A Realistic Student Budget
You do not need a giant budget. You need a clear one. Try splitting your monthly “room” budget into this simple structure:
| Category | Percentage | Example Spend (per month) |
|---|---|---|
| Materials (paint, stain, fabric) | 50% | $15 out of $30 |
| Tools (one-time buys) | 30% | $9 out of $30 |
| Extras (hardware, knobs, small decor) | 20% | $6 out of $30 |
Instead of doing everything in one weekend, spread projects over a semester. That way you can afford better primer, safer tools, and fewer regrets.
Low-Cost Materials That Change Everything
Some materials give you way more visual change per dollar. These are the campus heroes:
- Sample-size paint: Small cans meant for testing wall colors can fully cover a chair or side table.
- Spray paint: Great for metal legs, handles, simple geometric patterns. Use outdoors or in a very aired-out area with a mask.
- Wood stain & clear coat: Makes cheap wood look intentional. Stain adds color, clear coat protects from cup rings.
- Contact paper / adhesive vinyl: Fake marble, wood grain, solid colors. Ideal for flat surfaces like desks or shelves.
- Fabric remnants: Leftover upholstery fabric from craft shops, or old curtains and blankets for cushions and chair seats.
- New hardware: Handles, knobs, hooks. Small objects that instantly shift the style of a piece.
Basic Tools That Are Worth Owning
If you get these once, you will keep reusing them across projects and apartments:
- Medium and fine sandpaper sheets or sanding block
- Set of screwdrivers (flathead and Phillips)
- Paintbrushes (one wide, one small detail brush)
- Painter’s tape for clean lines
- Measuring tape and a basic pencil
- Mask and disposable gloves
- Small hammer and pliers
If your campus has a maker space or design lab, ask if students can borrow tools. You might not need to buy drills or saws at all.
Planning A Project: From “Random Chair” To “Room Anchor”
Most failed projects I see in dorms start with “I found this cool thing, now what?” and end with a half-painted piece left in the hallway.
Before touching paint, write a 3-line project brief: goal, constraints, and steps. It feels extra, but it saves money, time, and sanity.
Your 3-Line Project Brief
Use this template:
1. Goal: What problem is this piece solving in your room?
2. Constraints: Budget, time window, and tools you actually have.
3. Steps: List 3-5 steps in order. Keep it short.
Example for a free side table:
1. Goal: Turn this scratched side table into a nightstand with extra storage.
2. Constraints: $15 max, one afternoon, no power tools, shared balcony for painting.
3. Steps:
– Sand and wipe down
– Prime and paint base, stain top
– Add a fabric basket on the lower shelf
If you cannot explain the plan in three lines, the project might be too big for your current week.
Choosing A Style Without Overcomplicating It
You do not need a mood board with 200 pins. You need a simple direction so that your room does not look like five different apartments collided.
Ask yourself:
- Warm or cool? Do you like warmer shades (beige, terracotta, olive) or cooler ones (white, gray, blue)? Pick one side and stick to it.
- Simple or detailed? Do you like clean lines or vintage details? This guides hardware and paint choices.
- Two base colors + one accent: For example: white + light wood, with black as the accent.
Then for every piece, ask: “Does this fit my color trio and general vibe?” It keeps you from random impulse colors that will clash later.
Core Techniques: Cheap Tricks That Look High-End
When I watched more experienced makers work, I noticed they all rely on a few repeatable moves. You do not need 30 techniques. You need a handful that you can apply again and again.
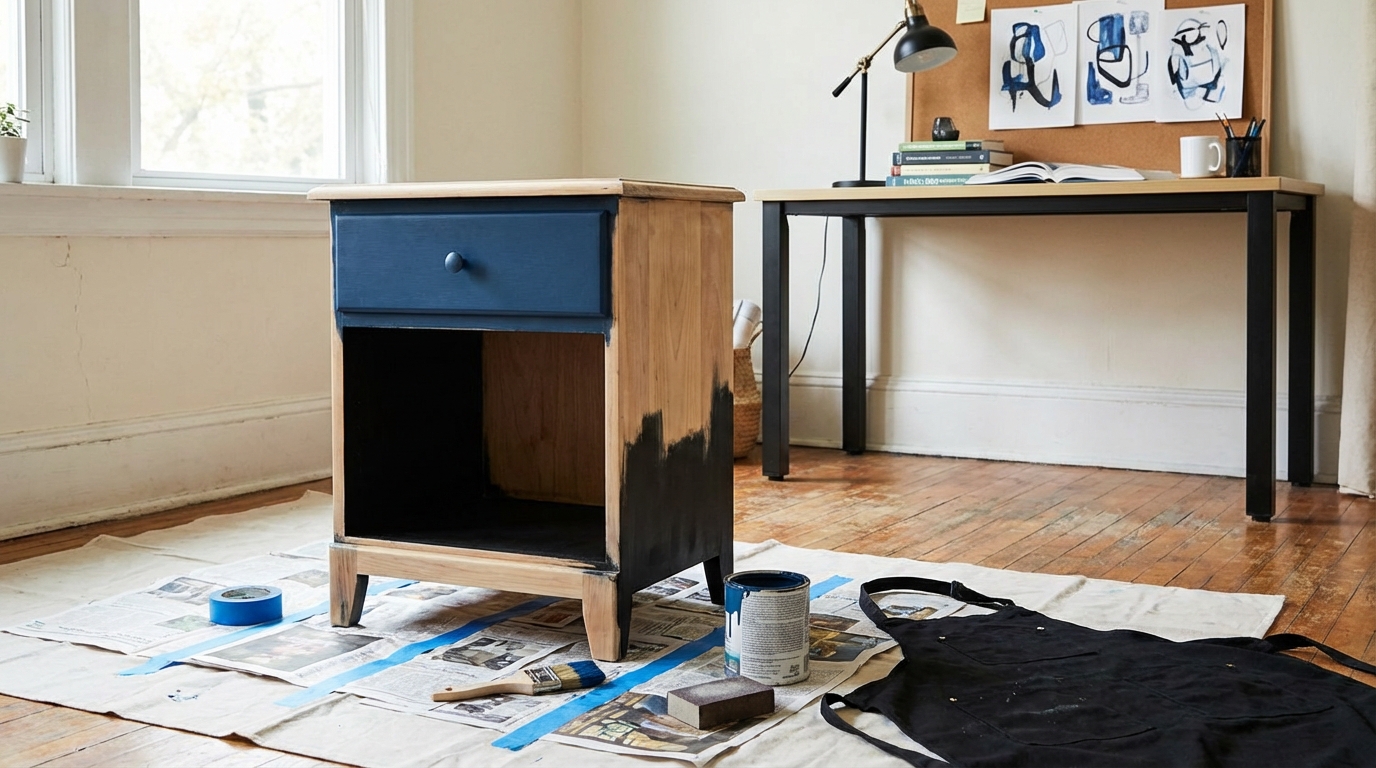
1. Painting Furniture Without It Looking Streaky
Paint is the fastest way to make something look new. It is also the fastest way to make something look like a rushed art project if you skip prep.
Basic sequence:
- Clean: Wipe with soapy water, then clean water. Dry well.
- Sand lightly: Medium grit, then fine grit. You are giving the surface some grip, not trying to remove all old color.
- Prime: Use a primer that matches your paint type (ask the store if unsure). This step improves coverage and durability.
- Paint 2-3 thin coats: Thin layers dry smoother than one thick coat. Light sanding between coats can help.
- Let it cure: Surfaces might feel dry in an hour but take a couple of days to fully harden. Do not stack heavy items immediately.
Tips that matter:
– Matte or satin finishes forgive imperfections more than high gloss.
– Use painter’s tape on edges and hardware. It is cheaper than fixing mistakes.
– If your room is small, favor lighter colors so the piece does not feel heavy.
2. Using Contact Paper To Fake Expensive Surfaces
Contact paper is like a sticker for grown-ups. It looks fake if you rush, but careful application can look surprisingly good.
Use it for:
- Desk surfaces with permanent marker stains
- Shelf tops that are scratched
- Drawer fronts for a color block effect
Steps:
1. Clean and dry the surface completely.
2. Measure with a bit extra around the edges.
3. Peel the backing slowly, smoothing with a credit card to push out air bubbles.
4. Cut corners at a diagonal and fold cleanly.
5. Seal edges with a clear coat if you want extra durability.
Avoid heavy use on surfaces that get wet or very hot. Edges can peel.
3. Reupholstering Simple Seats
Reupholstering sounds complicated until you realize many student chairs are just wooden bases with fabric stapled on.
You need:
– Fabric (old curtain, thrifted sheet, or upholstery remnant)
– Staple gun (you can borrow or get a basic one)
– Scissors
– Screwdriver (to remove seat from chair frame)
Process:
- Unscrew the seat from the chair.
- Lay the seat on your fabric, upside down, with at least 5-8 cm extra all around.
- Pull fabric tight and staple on one side, then the opposite side, working around.
- Fold corners neatly as you go to avoid big lumps.
- Trim excess fabric and reattach the seat to the frame.
This single trick can turn a boring chair into a focal point, and you can match it with a cushion on your bed to tie the room together.
4. Replacing Hardware For Instant Style
Old knobs and handles make furniture look tired. Replacing them is like changing shoes on an outfit.
Where it works:
– Dressers
– Wardrobes
– Nightstands
– Desk drawers
Steps:
1. Measure screw spacing on handles (center-to-center distance).
2. Choose a style that matches your room direction: black bars, brass knobs, wooden pulls.
3. Unscrew old hardware, fill extra holes with wood filler if needed, sand lightly, and drill new holes if spacing changes.
4. Install new hardware firmly, but do not over-tighten.
You can also spray paint existing metal handles if they are solid but the finish is dated.
Project Ideas: From Basic To Advanced
During one late-night group study session, we realized half the room had some kind of DIY furniture hack. These are the projects that came up again and again because they work.
Level 1: Easy Wins For One Afternoon
- Spray-painted metal chair
Clean, sand lightly, and spray in a bold color. Add a cushion or small seat pad. - Painted bookshelf with color-pop backing
Paint the frame a neutral color and the interior back panel a bright accent. Books and plants will stand out. - Contact paper desk makeover
Cover only the top surface, leave legs as they are. Add a cable management tray under the desk for function. - Crate side table
Stack two wooden crates on their sides, screw together, and add a board on top. Instant storage and table combo.
Level 2: Weekend Projects With Bigger Impact
- Two-tone dresser
Sand the top and stain it wood color, paint the rest a solid neutral, swap the knobs. It looks like a new piece. - Desk to vanity hybrid
Add a mirror on the wall above your small desk, attach a strip of LED lights under the top edge, and use one drawer for cosmetics and one for stationery. - Coffee table to bench
Add foam and fabric to the top, maybe shorten the legs slightly. You get seating plus a surface. - Open wardrobe
Convert a cheap shelf unit into a clothing rack by adding a hanging bar across the top for shirts and keeping two shelves at the bottom for shoes.
Level 3: Advanced Builds For Makers And Tinkerers
These projects may need power tools, a maker space, or the help of a friend who loves building.
- Lofted bed with under-storage
Raise your bed frame and design a storage system using crates or custom shelves underneath. Plan this carefully for safety. - Modular cube storage system
Build wooden cubes that can stack horizontally or vertically. Reconfigure when you move housing. - Fold-down wall desk
Hinged tabletop mounted to the wall that can fold up when you need floor space. Great for tiny rooms.
If you are new to building, do not start with structural mods like lofted beds without guidance. The risk-to-reward ratio is not in your favor.
Function First: Designing For Small Spaces
One lecture on human-centered design made me rethink my room. Why was I walking across the room just to grab a notebook, or stacking dishes on my desk?
In a small student room, every piece of furniture needs at least one job, and ideally two: storage plus something else.
Multi-Use Furniture Strategies
Ask this about every piece you touch:
– Can this store something inside or under it?
– Can this piece shift roles through the day?
Some examples:
- Storage ottoman: Footrest, coffee table with a tray, and inside storage for blankets or out-of-season clothes.
- Bench with shelves: Shoe storage plus seating both for putting shoes on and for guests.
- Desk with pegboard above: Work surface plus vertical storage for stationery and cables.
- Bedside crate tower: Stacked crates as nightstand plus book and water storage.
Thinking Vertically Instead Of Just Filling The Floor
Most student rooms have more empty wall space than floor space. Upcycling is not only about furniture; it can include mounted storage too.
Ideas:
- Floating shelves from old boards: Sand and paint leftover shelves, mount with simple brackets.
- Pegboard from scrap plywood: Drill holes in a grid, add pegs and small shelves for keys, headphones, and cables.
- Hook rail from reclaimed wood: Add hooks for bags and coats to keep the floor clearer.
Check your housing rules before drilling walls. If you cannot drill, command strips and over-door hooks can still give you vertical storage.
Sustainability, Safety, And Campus Rules
At some point you will hit the ethical questions: “Is this actually better, or am I just painting trash?” and “Can I do this without setting off the fire alarm?”
Why Upcycling Beats Buying More Flatpack Every Year
From a sustainability angle, upcycling has several benefits:
| Factor | Buying New | Upcycling |
|---|---|---|
| Waste | Packaging, repeated disposal when moving | Extends life of existing objects |
| Transport | Delivery trips, long supply chains | Often local pickup or already on campus |
| Materials | New manufacturing | More use out of resources already created |
Upcycling is not perfect. Paints and adhesives have their own environmental cost. The goal is not moral purity. It is better decisions within reach.
Safety Checks You Should Not Skip
This is where I am going to push back if you are tempted to ignore warnings. Some risks are not worth a pretty photo.
Non-negotiables:
- Ventilation: Paint, spray paint, and stain need fresh air. Work outside or next to open windows with masks. Do not spray in a small closed room.
- Fire safety: No fabric or paper decor around hot lamps or heaters. LED lights are safer than old bulbs.
- Weight limits: If you did not build it to hold a person, do not stand or climb on it. Reinforce benches and lofts properly.
- Lead and old finishes: Very old furniture may have lead-based paint. If you suspect this, do not sand aggressively. Look up local guidance or choose a different piece.
Respecting Housing and Campus Rules
Your housing contract probably has clauses about:
– Drilling into walls
– Painting permanent fixtures
– Using power tools
– Storing flammable materials
Take 15 minutes to actually read those parts. It is easier than paying for damage at the end of the year. If paint on walls is banned, focus on freestanding pieces and removable surfaces like contact paper and fabric panels.
Time Management: Fitting Projects Between Exams And Deadlines
There was a week where my desk was mid-project and I had three assignments due. That was the moment I learned not to start big projects on impulse.
Treat upcycling like lab work: prep your materials, run the experiment in controlled blocks, and leave time for things to dry.
Breaking Projects Into Manageable Sessions
Instead of “I will fix this entire dresser today,” think in 1-2 hour blocks:
– Session 1: Clean, sand, and plan colors.
– Session 2: Prime and paint first coat.
– Session 3: Second coat and touch-ups.
– Session 4: Hardware changes and styling.
This format helps you stop at natural pause points. It also prevents the classic mistake of painting at midnight before a morning class.
Shared Space Etiquette
If you share a balcony, hallway, or common room for projects:
- Lay down a sheet or plastic to protect floors.
- Label your project with your name and date.
- Set timers so you remember to move drying pieces.
- Offer to help someone else with their project one day. It keeps goodwill high.
Housing staff are more tolerant of students projects when they do not have to clean up mystery paint splashes.
Styling: Making Your Upcycled Pieces Feel Cohesive
At some point, your room may start to feel like a furniture showroom from five different decades. That is the point where styling decisions matter.
Keeping A Consistent Thread
Choose 1-2 elements that repeat across pieces:
– The same wood stain color on every piece with wood.
– The same metal finish for all visible hardware.
– A repeated accent color in small areas.
For example:
- All desk and shelf hardware in matte black.
- All visible wood parts stained light oak.
- Accent color: muted green on a chair seat and one stripe on a shelf.
Your brain reads repetition as harmony. It does not care if the furniture came from five different sources.
Balancing DIY With Store-Bought Items
You do not need to make everything yourself. In fact, if every single object is a project, your room might feel visually noisy.
Good balance:
| Item Type | DIY / Upcycled | Bought |
|---|---|---|
| Big furniture | Desk, shelves, coffee table | Mattress, maybe one chair |
| Storage | Crate shelves, painted drawers | Under-bed boxes, key organizers |
| Decor | Art prints, plant stands | Bedding, rug |
Focus your creative energy on a few large-impact pieces and let simple bought items fill the gaps in a neutral way.
Turning Upcycling Into A Campus Micro-Hustle (Carefully)
At some point, someone will say, “Can you make one of those for me?” That is where this stops being just decor and starts to look like a tiny startup experiment.
If you start selling upcycled pieces, treat it as a small test of pricing, time tracking, and communication, not just as free cash.
Pricing Your Work Realistically
Common mistake: charging only for materials and ignoring time. That might be fine for one project, but it is not sustainable.
Try this simple formula:
- Cost of materials (including small things like screws).
- Plus a time rate (even a small one, for example $8-10 per hour).
- Plus a small buffer (10-20%) for risk and mistakes.
If the final price feels too high for your target student market, scale back the complexity of the project instead of just cutting your time value to zero.
Where Things Can Go Wrong
This is where I will not just cheerlead:
– If you overcommit during exam season, clients (your friends) get annoyed.
– If you undercharge, you burn out and start resenting the work.
– If you ignore safety or housing rules, your “business” can draw the wrong kind of attention.
Start by doing a couple of projects at cost for close friends to understand your real time and skill level. Then decide if you want to scale.
Documenting Your Projects Like A Builder, Not Just An Aesthetic Page
One thing I regret is not documenting early projects well. Not just for social media, but for learning.
Before / After / Process Shots
Take photos of:
- The raw piece when you found it.
- The messy middle, with tools and paint out.
- Close-ups of details like new hardware and joints.
- The final setup in your room.
These become more than “pretty pictures.” They are a record of decisions. When something chips or fails, you can look back at what you did.
Simple Notes For Future You
Keep a note in your phone or a small notebook:
– Project name and date
– Materials used
– Brand and color of paints or stains
– Steps taken
– What went wrong
– What you would change next time
Treat each furniture piece like a mini case study. The habit of reflecting on what worked and what did not translates directly into better projects, better products, and better problem solving.
When you present yourself for internships, side projects like this signal initiative and practical creativity. You are not just talking about “entrepreneurial mindset”; you have physical evidence of it sitting in your room.


