My back started complaining before my GPA did. One night in the library, hunched over my laptop, I realized my “study setup” was basically a slow-motion injury. It was not that I was lazy; my desk just felt like it was actively fighting me.
If you want the short version: a good late-night study setup keeps your spine neutral, your wrists straight, your eyes level with your screen, and your body moving a bit every 20 to 30 minutes. You do not need fancy gear, but you do need to adjust your chair, table height, screen position, and lighting so your body is not doing weird angles for hours.
Ergonomics is not about expensive gear; it is about removing tiny bits of strain that stack up into real problems over weeks and semesters.
Why Late-Night Studying Feels Physically Awful
At 11:30 p.m., your brain is juggling fatigue, caffeine, and deadlines. Your body quietly adds its own chaos: stiff neck, aching wrists, sore lower back, dry eyes. The tricky part is that discomfort builds so slowly that it feels “normal.”
During a long lecture, I realized something: my posture was great for the first 10 minutes, decent for the next 20, and then it just collapsed. Not because I am lazy, but because the setup did not support me once I got tired.
We usually blame our discipline or motivation. The real problem is often mechanical.
- Seat too low or too high.
- Desk designed for aesthetics, not spine health.
- Laptop pulling our shoulders forward like a magnet.
- Lighting that forces us to squint at our screens or notes.
If your setup makes “good posture” feel like a workout, the setup is wrong, not you.
The Core Ergonomics Checklist for Students
I like to think of a desk setup as a small engineering problem: you are matching your body to your tools with minimum strain and maximum focus.
Here is the core checklist you want to hit for late-night study sessions:
- Neutral spine: No extreme arching or rounding. Your back should feel supported, not forced into a position.
- Hip-knee angle: Roughly 90 to 110 degrees. Hips slightly higher than knees is good.
- Feet: Flat on the floor or a stable support, not dangling or hooked behind the chair.
- Elbows: Around 90 degrees, close to your body, wrists straight, shoulders relaxed.
- Screen: Top of screen near eye level, about an arm’s length away.
- Lighting: No sharp glare on screens and no deep shadows on your notes.
- Movement: Micro-breaks: 30 to 60 seconds of movement every 20 to 30 minutes.
Your body is the hardware that runs every all-nighter. If that hardware overheats, your output drops, no matter how “motivated” you are.
Dialing In Your Chair: Where Ergonomics Actually Starts
You can hack a bad chair, but you cannot fully escape it. I realized during a stats cram session that my lower back pain was not from “studying too hard”; it was from a chair designed more for stacking than for sitting.
Ideal Chair Basics (Student Edition)
Here is what you want from a study chair, whether it is a fancy office chair, a dorm chair, or a random dining chair:
- Seat height: When you sit, your feet are flat, and your knees are at or slightly below hip level.
- Seat depth: When you sit back, there is a small gap between the back of your knees and the chair edge (about 2 to 3 fingers wide).
- Back support: Something touches the natural curve of your lower back, not just your shoulder blades.
- Stable base: No wobble that makes your muscles fight for balance.
If your campus chair is terrible, you still have options.
How To Hack a Bad Chair
Use what you have. Most students are not buying a $300 chair, and that is fine.
| Problem | DIY Fix |
|---|---|
| Seat too low | Sit on a firm cushion or folded blanket to raise hip height. |
| Seat too high, feet dangling | Use a stack of books, a shoebox, or a low stool as a footrest. |
| No lower back support | Roll a small towel or sweatshirt and place it behind your lower back. |
| Seat edge cutting into thighs | Add a folded blanket or cushion to smooth the edge and adjust position. |
If you fix only one thing this semester, fix your lower back support. It affects posture, breathing, and how long you can focus.
Desk Height, Keyboard Position, and the Wrist Problem
Late at night, the first body part that starts whispering complaints is not the back. It is usually the wrist or shoulder.
If your desk is too high, your shoulders creep up. If it is too low, you hunch down. Neither is great for 3-hour problem sets.
The Right Desk Height (With What You Already Have)
Your desk is at a good height if:
- Your elbows sit near 90 degrees when typing or writing.
- Your shoulders feel relaxed, not shrugging or stretching down.
- Your wrists stay straight, not bent up or down.
If your desk is fixed (like most campus desks), adjust your chair and everything else around it:
- If the desk is too high: raise your seat with cushions and support your feet with a footrest.
- If the desk is too low: lower the chair if possible or move to a different table that matches your height better.
Preventing Wrist Pain During Typing
Laptop keyboards are not wrist-friendly by default, especially when the laptop is flat on the desk.
Good wrist position:
- Wrists straight, not cocked up like you are holding a tray.
- Forearms roughly parallel to the floor.
- Hands floating slightly over the keys, not crushing the edge of the desk.
Simple fixes:
- Pull the keyboard closer: You should not have to reach far forward.
- Use a wrist rest carefully: Place it just in front of the keyboard, rest the heels of your palms gently, but keep wrists from bending upwards.
- Do brief stretches: Every 20 to 30 minutes, gently flex and extend your wrists and open/close your hands.
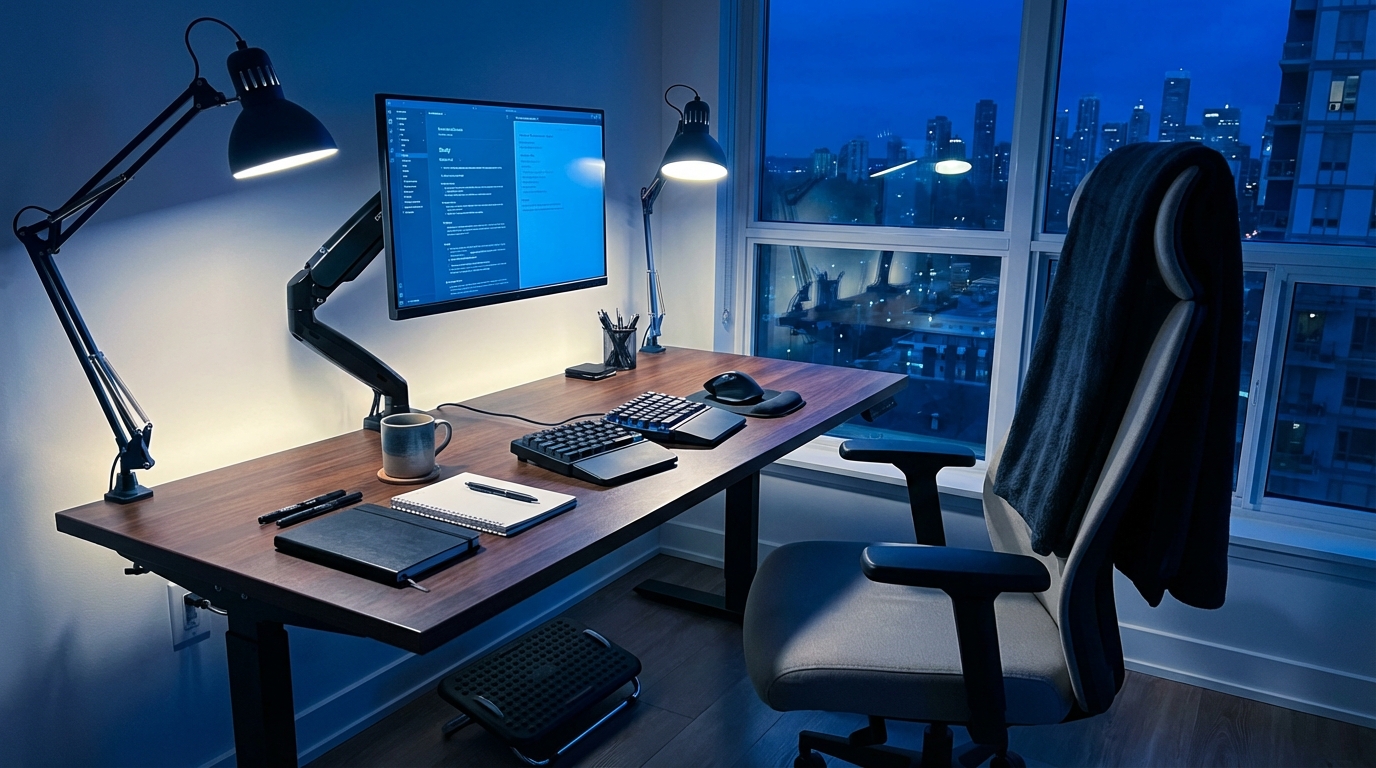
Laptop Ergonomics: The Student’s Main Boss Fight
Almost all of us live on laptops. That form factor is ergonomically awkward: the screen and keyboard are locked together, which means either your neck suffers or your wrists suffer.
The goal: separate screen height from hand position as much as your budget allows.
Leveling Your Screen: Neck-Friendly Setup
When you stare down at a laptop for hours, your neck is doing a slow, quiet protest. The fix is surprisingly low-tech:
- Raise the laptop so the top of the screen is near eye level.
- Keep the screen about an arm’s length away.
- Angle the screen so you do not crane your neck forward to read small text.
Student-friendly “stands”:
- Thick textbooks stacked under the laptop.
- A shoebox or storage box.
- A cheap metal laptop stand if you can get one.
If you raise your laptop, you must solve the keyboard problem next.
The External Keyboard + Mouse Upgrade
This is the one “upgrade” that changes everything for long sessions.
If you can buy only one ergonomic item as a student, make it an external keyboard and mouse.
Why:
- You can place the keyboard at elbow height, wrists straight.
- You can bring the mouse close to your body, not off to the side on a weird angle.
- You can keep the screen high and your neck neutral.
Even a very cheap external keyboard and mouse can be a big gain in comfort. Wired is totally fine. Fancy features are optional.
Trackpads vs Mice for Long Nights
Trackpads are convenient. For quick tasks, they are fine. For a 4-hour coding or essay session, they may not be the best choice.
Pros of a mouse:
- Less thumb strain than heavy trackpad use.
- More neutral hand position.
- Better precision for design, spreadsheets, coding, and editing.
If you are stuck with a trackpad:
- Use tap-to-click instead of physical pressing to reduce finger strain.
- Adjust pointer speed so you do not need giant hand movements.
- Switch primary hand occasionally if you can manage it.
Posture That Survives a 3-Hour Cram Session
Perfect posture is a myth. The goal is not to freeze in one “ideal” position. The goal is to cycle through good positions and avoid the obviously bad ones.
Think of posture as a range, not a single pose.
The “Neutral” Sitting Position
Start here:
- Sit back so your pelvis is against the backrest, not sliding forward.
- Use a small cushion or rolled towel to support your lower back.
- Feet flat on the floor or on a stable support.
- Shoulders relaxed, not rolled forward or shrugged.
- Chin slightly tucked, as if you are trying to make a double chin very gently.
This is your starting point. You will not stay here perfectly, but it is where you reset every time you catch yourself slumping.
Positions To Avoid for Long Periods
Some positions are fine for a short time, terrible for a whole night.
- Leaning forward with your chin almost over the keyboard.
- Twisting your torso to one side while typing or reading.
- Sitting on one leg or crossing the same leg over the other for hours.
- Perching on the very front edge of the chair with no back contact.
You can still cross your legs or lean. Just rotate out of those positions regularly.
The 30-Second Reset Routine
Every 20 to 30 minutes, do a tiny “reset.” It feels silly, but it works.
- Stand up, straighten your legs, reach your arms overhead.
- Roll your shoulders gently backward 5 to 10 times.
- Look away into the distance for a few seconds (give your eyes a break).
- Then sit back, set up your neutral position again, and continue.
This is short enough that it does not break your flow but long enough to interrupt the slow slump into a weird shape.
Lighting, Screens, and the War on Eye Strain
Late-night setups often have two modes: “cave” or “spotlight interrogation.” Both are tough on your eyes.
I noticed in a silent study room that my focus dropped long before my motivation did, and the trigger was usually eye fatigue, not boredom.
Good Lighting for Mixed Screen + Paper Work
You want balanced light:
- Room light that is not too dim.
- A desk lamp that lights your work area without glaring into your eyes or directly onto your screen.
- No strong backlight behind your screen that makes it hard to see.
Good lamp placement:
- Place the lamp to the side opposite your writing hand (to avoid casting big shadows).
- Aim the light so it bounces slightly off the desk, not straight into your eyes.
- Avoid bright light sources directly behind your screen.
Screen Brightness and Color Settings
Practical rules:
- Match screen brightness to the room: not a lighthouse, not a faint ghost.
- Use warmer color temperature at night. Many systems have a built-in “night” mode.
- Increase font sizes so you are not squinting.
And the classic:
- 20-20-20 rule: Every 20 minutes, look at something 20 feet away for about 20 seconds.
It sounds like a cliché, but it is like a stretch for your eye muscles.
Standing Desks and “Alternative” Setups on Campus
At some point, many of us flirt with the idea of a standing setup: “If I stand, my posture will fix itself.” Not quite, but used well, it can help.
Is Standing Better Than Sitting?
Standing is not automatically better. Static standing can also be tiring and rough on your back and feet. The key is alternating.
A good pattern is:
- 30 to 45 minutes sitting, then 10 to 15 minutes standing.
- Repeat, based on comfort and focus.
DIY Standing Setups for Students
You probably do not have a personal motorized desk. That is fine.
Some practical options:
- Find tall tables or high counters in the library or cafeteria and turn them into temporary standing desks.
- Use a sturdy box or stack of books on a regular table to raise your laptop (still use an external keyboard at lower height if possible).
- Stand for “light” tasks: reviewing notes, watching lectures, answering emails.
Foot comfort:
- Wear shoes with cushioning and support when standing for long periods.
- Shift your weight periodically, do not lock your knees.
- If you stand at home, a towel or yoga mat is better than bare floor.
Backpacks, Textbooks, and Carrying Your Setup With You
Your desk is not the only place where ergonomics matter. The way you transport your gear can undo a lot of your careful chair and desk setup.
Backpack Ergonomics 101
Key ideas:
- Two straps: Wear both. The single-strap “cool” method shifts the load and strains one side of your body.
- Close to your body: Tighten the shoulder straps so the bag does not hang down near your lower back.
- Weight distribution: Heavier items closer to your spine, lighter items outward.
If your backpack is a mobile brick, your shoulders and back are paying for it later at your desk.
Portable Ergonomics for Library Hopping
Campus life usually means moving between buildings and study spots. You can still carry a bit of ergonomics with you:
- A lightweight external mouse.
- A slim external keyboard (if your bag has the space).
- A foldable laptop stand or just the habit of stacking books to raise your screen.
- A small towel or scarf that works as lumbar support on any chair.
Ergonomics for students is less “one perfect throne at home” and more a portable toolkit you can deploy anywhere.
Mental Performance and Physical Comfort: They Are Linked
When I started tweaking my setup, I expected fewer aches. I did not expect better grades. That sounded like a marketing claim. Then I noticed something: longer focus blocks, fewer “I need to lie down” moments, and less irritation with assignments.
How Discomfort Quietly Wrecks Focus
Minor discomfort does not scream. It whispers. It shows up as:
- Restlessness and shifting around in your chair.
- Checking your phone more as a distraction from physical irritations.
- Shorter attention spans during reading.
- Mood dips during late sessions.
Your brain keeps part of its processing power on low-level pain management, leaving less for heavy mental tasks.
Why Movement Helps Studying, Not Just Fitness
There is a fear: “If I stand up or move, I will lose focus.” The opposite often happens.
Short movement breaks:
- Increase blood flow to muscles and brain.
- Reduce stiffness that pulls your attention away.
- Sometimes help you solve a stuck problem just by changing body position.
If you time breaks intentionally (for example, at the end of a Pomodoro session), they stop feeling like procrastination and start feeling like part of the work system.
Building a Late-Night Ergonomic Routine
One big reset is nice, but the real advantage comes from a repeatable routine. Think pre-flight checklist, but for late-night study.
Pre-Study Setup Ritual (5 Minutes)
Before you start a serious session:
- Chair: Sit back, adjust height, add lumbar support if needed.
- Desk: Clear the space where your arms rest, so you are not dodging clutter.
- Screen: Raise laptop, adjust angle, match brightness to room.
- Keyboard/Mouse/Notebook: Place where your arms can rest comfortably.
- Lighting: Turn on room light and position desk lamp to avoid glare.
This feels like “lost time” at first. After a week, it feels like plugging your brain into a better docking station.
During-Study Micro-Habits
While studying:
- Every 20 to 30 minutes: small posture reset and eye break.
- Each hour: stand up, walk, or stretch for 2 to 3 minutes.
- Notice any persistent discomfort: adjust setup, do not just push through.
If you track focus with timers, pair those timers with movement, not just task switches.
Post-Study Cooldown (2 Minutes)
Before you crash into bed or scroll your phone:
- Gently stretch your neck side to side.
- Open your chest with a doorway stretch or by clasping hands behind your back.
- Do a few slow squats or toe touches to reset your lower back and legs.
It feels minor. The effect accumulates across a semester.
Case Studies: Realistic Student Setups on a Budget
These are simplified versions of setups I have seen that work well under student constraints.
Case 1: Tiny Dorm Room, One Desk, Many Roles
Constraints:
- Single narrow desk against a wall.
- Standard campus chair, no height adjustment.
- Laptop only at first, limited budget.
Upgrades over time:
- Used textbooks as a laptop stand.
- Cheap wired keyboard and mouse bought online.
- Small adjustable desk lamp.
- Rolled towel as lumbar support.
Outcome:
- Neck pain dropped after raising the screen.
- Long writing sessions became more tolerable once the keyboard and mouse were at better height.
- The student could switch the same desk between “study,” “gaming,” and “Zoom” by small position shifts.
Case 2: Library Hopper With a Backpack Setup
Constraints:
- No fixed study spot.
- Relies on library and café tables.
- Needs portable gear only.
Portable kit:
- Slim wireless keyboard.
- Compact mouse.
- Foldable laptop stand.
- Light scarf used as back support on any chair.
Strategy:
- Arrive at a table, raise laptop with stand, place keyboard and mouse at edge of table.
- Use scarf rolled behind lower back on rigid chairs.
- Move between sitting and standing tables during long days.
Outcome:
- Less shoulder fatigue from repetitive laptop-only use.
- Better endurance during back-to-back study blocks.
Case 3: Off-Campus Room With DIY Standing Option
Constraints:
- Cheap desk and simple chair.
- No space or money for a dedicated standing desk.
Setup:
- Main sitting desk: chair adjusted with cushions, laptop on stand, external keyboard and mouse.
- Standing “desk”: sturdy dresser with a box on top for laptop, keyboard on dresser surface.
Use pattern:
- Start analytic work sitting.
- Switch to standing for reading PDFs or watching lecture videos.
- Alternate a few times per night during intense study periods.
Outcome:
- Reduced lower back tightness late at night.
- Standing blocks often used for lighter cognitive tasks.
When Your Setup Is Still Not Enough
Sometimes you can do all the right adjustments and still feel real pain. At that point, the solution is not more cushions or another laptop stand.
Red flags:
- Numbness or tingling in hands or fingers.
- Sharp, shooting pain in wrists, forearms, or shoulders.
- Back pain that interferes with sleep or daily movement.
- Headaches that consistently start during study sessions.
If any of these show up regularly, you are not “soft”; you are getting signals that something more serious is brewing. This is where speaking to a health professional, physical therapist, or campus health center makes sense, even if it feels like “overreacting.”
Treat early signals like an early warning system, not background noise you are supposed to ignore.
Making Ergonomics Part of Student Culture
Most campus discussions focus on productivity apps, study techniques, or majors. Physical setup gets ignored until someone has a real injury.
The funny part is that ergonomics might be one of the lowest-effort, highest-return tweaks you can make to your student life. It is not glamorous. It does not look impressive on LinkedIn. It just quietly supports everything else.
You do not need perfect discipline, a premium chair, or a dedicated office. You need:
- A neutral spine and supported lower back.
- Screen at eye level, keyboard and mouse at elbow height.
- Lighting that respects your eyes.
- Regular movement built into your schedule.
From there, your late-night study sessions stop feeling like a physical battle and start feeling more like what they were supposed to be: your brain wrestling with ideas, not your body wrestling with furniture.

