You never really think about how much water your apartment floor can hold until you wake up at 2 a.m. and your sock makes that awful squish sound. In Salt Lake, with old pipes, random winter thaws, and those surprise storms, it feels like every student has at least one flood story by graduation.
If you want the simple answer: when water hits your dorm or student apartment, act fast, kill the power where it is wet, protect your tech and class projects first, move your stuff off the floor, document everything with photos, start soaking and drying right away, tell your landlord and renters insurance, and if it is more than a basic mop-up job, call a local Salt Lake water damage repair company before the damage spreads. That is the core of it. The rest is detail, timing, and honestly, staying calmer than you feel.
Why students in Salt Lake are weirdly exposed to water damage
Most students in Salt Lake live in one of three setups: on-campus housing, older rentals near campus, or newer shared apartments that look nice but cut corners in places you do not see.
Here is why that matters:
- Old houses and basement apartments are common around campus, and those are magnets for leaks and flooding.
- Snow melt and quick temperature swings can push water toward foundations and low windows.
- Shared spaces mean shared problems: a roommate leaves a tap on, a neighbor above you cracks a pipe, someone does laundry wrong.
And you are usually juggling classes, maybe a campus job, maybe a side project or startup idea. You do not have hours to figure out building codes and dehumidifier specs in the middle of a mess.
So the goal is simple: you do not need to be an expert. You just need a clear mental checklist for the first hour, then a basic plan for the next few days.
If you remember nothing else, remember this: the first 24 hours after water damage will decide if it is a minor headache or a long, moldy nightmare.
Step 1: Stay safe before you touch anything
This part sounds dramatic, but it matters. Water plus electricity is a bad mix, and people forget that when they panic about their laptop.
Check for electrical risks
Ask yourself a few quick questions:
- Is water touching outlets, power strips, or extension cords?
- Is the ceiling sagging or dripping near light fixtures?
- Did anything spark, smell burnt, or flicker?
If you answer yes to any of those:
- Do not step into standing water if you are not sure about live power.
- If you can safely reach your breaker panel, shut off power to the affected room.
- If you cannot reach it safely, back away and call your landlord or property manager.
Your grades will recover from a late assignment. They will not recover from getting shocked in a flooded room to save a $40 lamp.
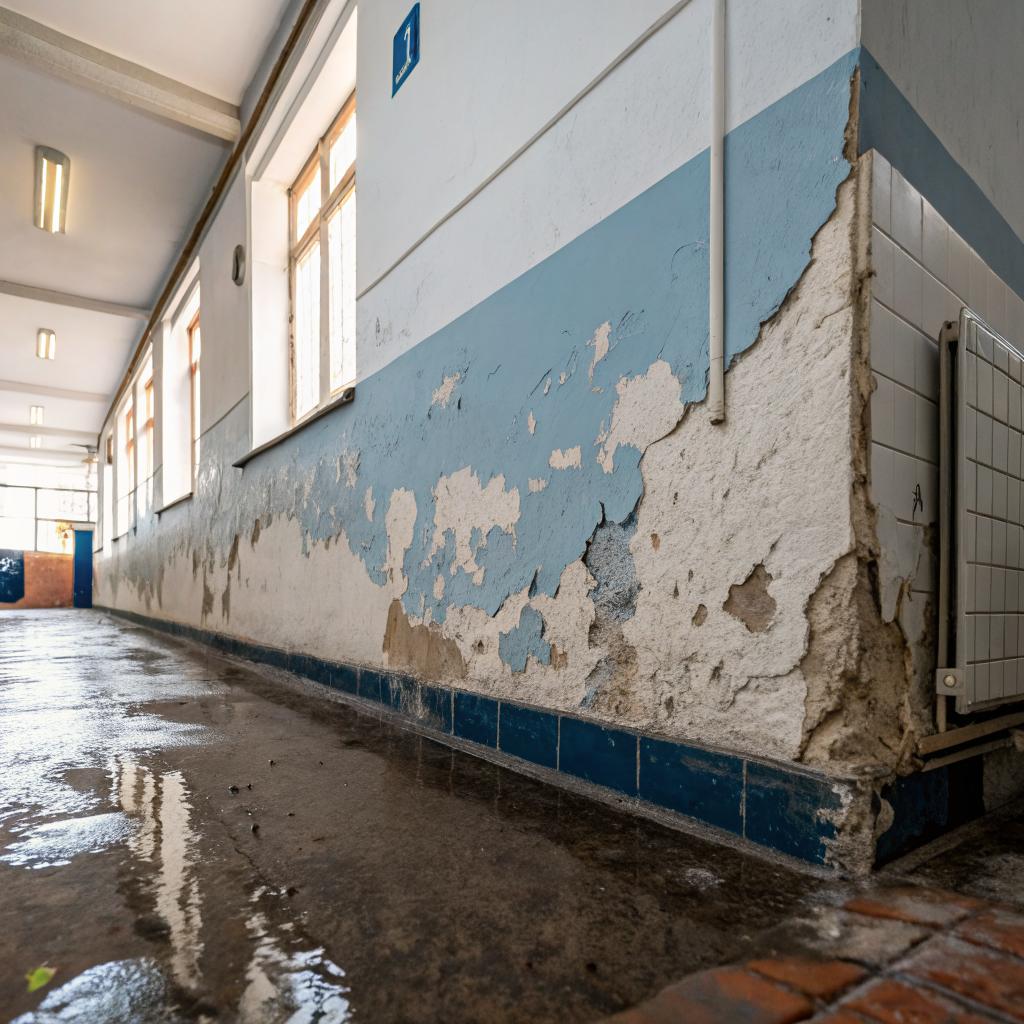
Look at the ceiling and walls
If you see:
- Bulging or sagging patches in the ceiling
- Big cracks that were not there yesterday
- Paint bubbling on walls
Step out from under that area. That material might fail and drop. Let your landlord or maintenance know right away and keep your stuff far from that spot.
Watch your footing
This sounds obvious, but again, panic makes people clumsy:
- Avoid walking fast on wet tile or wood.
- Wear shoes, not socks, especially if you do not know what is in the water.
- Assume there might be glass or sharp bits if a pipe burst above a light fixture or shelf.
Once safety is handled, you can care about your things.
Step 2: Protect what actually matters to you
In a flood, the order in which you move things can save you real money and stress. Your rug can wait. Your midterm notes cannot.
Here is a simple order that works for most students:
- Electronics and backups
- Paper and physical work
- ID, documents, and daily essentials
- Furniture and decor
Save your tech first
Unplug, do not yank cords by the wire, and avoid standing in water while handling power strips.
Move to a dry area:
- Laptops, tablets, phones, chargers
- External drives, USB sticks, SD cards
- Any project hardware or lab equipment you borrowed
If a device got wet:
- Turn it off right away if it is on.
- Do not plug it in to “see if it works.”
- Do not use a hairdryer; that can push water deeper.
- Blot the outside, then leave it in a dry, ventilated space.
Rice is overrated. Airflow and time work better than myths.
Rescue your schoolwork and startup stuff
This part hurts the most when it goes wrong. If you are building something on campus, you probably have:
- Notebooks full of sketches and test results
- Printed research articles with notes
- Whiteboard photos you have not backed up properly
- Prototype pieces or small parts stored low to the ground
Move all of that to a dry bed, table, or countertop. For wet paper:
- Separate pages gently; do not try to peel stuck chunks fast.
- Lay sheets flat on clean, dry surfaces or stand them up slightly fanned out.
- If you cannot dry everything right away, place damp pages in a plastic bag and freeze them to slow damage. You can dry them later.
Backups sound boring until the night your final project binder is sitting in a puddle. Digital plus physical beats either alone.
Everyday must-haves
Move these next:
- Wallet, keys, ID, passport
- Medications
- One or two changes of clothes
- Toiletries and anything you need to function on campus in the morning
Keep them in a backpack like you are prepping for an unplanned sleepover somewhere else. Because that might happen.
Step 3: Figure out what kind of water you are dealing with
Not all water damage is equal. The type of water decides how aggressive you need to be and how much you should handle yourself.
Here is a simple table that helps:
| Water type | Common causes in student housing | Risk level | What you should do |
|---|---|---|---|
| Clean water | Burst supply pipe, leaking sink, rain through open window | Lower | Safe to help clean up, dry fast, still watch for mold |
| Gray water | Washing machine leak, dishwasher overflow, lightly dirty water | Medium | Wear gloves, avoid contact with eyes/mouth, wash hands well |
| Black water | Sewage backup, toilet overflow with waste, outdoor flood water | High | Do not wade in it, get professional help, keep kids and pets away |
If the water looks clear and you know it is from a sink or a broken pipe, you can do more yourself.
If there is any sign of sewage, strong smell, or dirty street water, treat it as black water and avoid direct contact.
Step 4: The first 60 minutes of cleanup
This is the part that decides how bad the damage gets. You do not need special gear, just focus and some basic tools.
Stop the source, or at least slow it down
Look around and ask:
- Is a tap open or a toilet running nonstop?
- Is water coming from the ceiling from a neighbor above?
- Is there a visible pipe under a sink that is spraying?
You can:
- Turn off the tap or shut off the toilet valve behind the toilet.
- Place a bucket under active drips.
- Use a trash can, bowl, or any container if you do not have a bucket.
- Text upstairs neighbors if it is clearly from their place.
Do not try to fix pipes yourself. Just slow the flow and report it.
Start removing standing water
If the water is shallow and safe to touch:
- Use towels, old t-shirts, or blankets as makeshift mops.
- Wring them out into a bucket or sink and repeat.
- If you have a wet/dry shop vac, this is the moment it earns its space.
Work from the edges toward the center so water does not spread into dry areas.
If you feel overwhelmed, remind yourself that every minute of drying now is one less problem later.
Protect floors and furniture
This part is often ignored in student housing, but it is where deposits vanish.
You can:
- Slide aluminum foil or plastic lids under furniture legs to keep them from soaking up water.
- Lift furniture slightly with bricks, plastic bins, or textbooks you do not care about.
- Roll up rugs and move them to a dry area, then unroll them to dry faster.
If water has reached under vinyl or laminate flooring and it is bubbling, make sure you photograph it. That is not on you to repair.
Step 5: Document everything like a founder saving receipts
Students who are into startups tend to be better at this part because they already think in terms of records and proof. You need the same mindset with water damage.
Take wide and close photos
Use your phone and get:
- Wide shots of each room that is affected
- Close-ups of damage on walls, floors, furniture
- Photos of the source if you can see it (burst pipe, leaking ceiling, etc.)
Turn on the timestamp if you can, or at least keep the photos in order.
Make a quick damage list
Nothing fancy, just write in your notes app:
- What got wet
- What looks ruined
- Any serial numbers for big items like laptops or monitors
This helps later with renters insurance and with your landlord. It also helps when you are stressed and trying to remember what was where.
Save receipts and messages
If you buy anything for cleanup:
- Box fans
- Dehumidifier rental
- Cleaning supplies
- Laundry costs for soaked clothes or bedding
Keep the receipts in one folder or email thread. Also keep:
- Texts or emails to your landlord or property manager
- Any replies about repairs, access times, or responsibility
This sounds like overkill, until one person says, “We never heard from you” and you can literally scroll and show them.
Step 6: Talk to your landlord, campus housing, and insurance
This is the part many students delay because they hope it will “dry out and be fine.” That delay can hurt you.
Contact housing or landlord early
Tell them:
- Where the water is
- When you noticed it
- What you think caused it, if you know
- What you have done so far
Try to get something in writing, even if you call first. A follow up text like:
“Hi, just confirming we spoke at 3:15 about the water leak in my room. Floor is wet from the window to the closet, and ceiling near the window is dripping.”
That is enough.
Know what you are responsible for
Usually:
- They handle structural repairs: walls, floors, ceilings, pipes.
- You handle your personal items and your renters insurance claim.
If you did something that caused the damage, like overflowing a bathtub, still tell them. Hiding it almost always makes it worse.
Renters insurance is not just a line on a lease
A lot of students sign up for renters insurance because the lease tells them to, then forget what it covers.
Common coverage:
- Your personal property that was damaged by leaks or broken pipes
- Possibly a place to stay if your unit is unlivable for a bit
It usually does not cover damage caused by you ignoring a leak for weeks. That is another reason speed matters.
Treat your renters insurance like a backup drive for your stuff. Boring until the one day you are grateful it exists.
Call or go online, start a claim, and upload your photos and list. You do not need formal language. Just be accurate.
Step 7: Drying your space the smart way
Once the active leak is handled and standing water is gone, the game shifts to moisture that you cannot see easily.
Mold and odors start when things stay damp, not just wet.
Get air moving
You do not need fancy equipment to start:
- Open windows if the air outside is dry and the weather allows it.
- Position fans so they blow across wet surfaces toward an exit, not just in circles.
- Prop doors open to increase airflow between rooms.
If you can borrow or rent a dehumidifier, put it in the dampest room, close windows, and let it run. Empty the tank regularly.
Know what dries and what rarely recovers
Here is a simple table for common student items:
| Item | Chance of recovery | What to try |
|---|---|---|
| Hard floors (tile, sealed wood) | High | Dry quickly, clean with mild cleaner, keep fans on it |
| Area rugs | Medium | Hang or lay flat to dry fully, clean both sides, watch for smell |
| Mattresses | Low if soaked deep | If only slightly damp on surface, dry and sanitize. If soaked, replacing is safer. |
| Particle board furniture (cheap desks, shelves) | Low | If swollen or crumbling, document for replacement. Light splashes are fine. |
| Clothes and bedding | High | Wash soon, use hot water if safe for the fabric, fully dry |
If something smells musty even after drying, especially soft items, mold may already be active. That is not something to ignore if you share a small room.
Step 8: When to call professionals instead of just “winging it”
Students are used to doing things themselves, especially those trying to build a company or side project on a student budget. But some water damage is not a DIY thing.
Here are some signals that you need professionals:
- Water was higher than your ankle at any point.
- It soaked into walls, baseboards, or cabinets.
- It came from a toilet, sewer, or outdoor flood water.
- Your place still feels damp after 24 to 48 hours of fans and open windows.
- You see mold spots or smell that strong musty odor.
Professionals can:
- Measure moisture inside walls and floors.
- Remove baseboards and dry behind them.
- Disinfect areas that had dirty water.
- Write reports for landlords and insurance.
If you are working on a hardware project, lab gear, or any expensive equipment, getting that checked by experts is also usually worth it. Some labs have rules about contaminated gear anyway.
Student startups, labs, and shared makerspaces: extra things to think about
If your campus life includes building things, hacking in makerspaces, or managing shared gear with a team, water damage can hit harder.
Protecting prototypes and hardware
Simple habits reduce risk a lot:
- Store electronics and small parts in plastic bins, not cardboard boxes on the floor.
- Keep one shelf in your room or lab labeled “off the floor” for active projects.
- Do not leave key hardware parked under windows or AC units.
If flooding hits your project:
- Label damaged parts clearly so you do not accidentally reuse them later.
- Document with photos for any grant, lab, or club funding records.
- Talk to your advisor or club lead; they may have funds or contacts to repair or replace items.
Shared responsibility in team spaces
In startup or club spaces, no one wants to be the person who ignored a leak.
You can suggest simple rules:
- Everyone who notices a leak logs it in a shared channel (Slack, Discord, group chat).
- One person is the contact for building maintenance.
- A quick checklist is printed on the wall: power off, move tech, photos, report.
It is not dramatic. It is just basic risk management for your work.
Preventing the next flood: small habits that actually help
You cannot control every pipe in your building, but you can reduce your odds a bit.
Things you can do in 10 minutes
- Look under sinks for slow drips onto wood or stored items.
- Check windows for broken seals or obvious gaps where rain got in.
- Move surge protectors and power strips off the floor.
- Store important papers and electronics at least one shelf above the ground.
If you are in a basement unit:
- Watch where water pools outside after heavy rain or snow melt.
- Keep anything important away from exterior walls that already feel damp.
Water damage and your long-term projects
Students who are building something long-term, like a business or research project, should think past this semester.
Ask yourself:
- Do I have a backup of all project files in the cloud?
- Do I have photos or documentation of physical prototypes?
- If my room flooded tonight, could I still explain my work to an investor, professor, or partner tomorrow?
If the answer is no, you do not need to panic. Just spend an hour this week making it a yes.
Myths students believe about water damage
Some of the worst decisions during a flood come from half-true advice.
“It will dry on its own, just open the window”
Sometimes, yes. Sometimes not.
If humidity is high outside, open windows might slow drying. And hidden moisture in walls does not magically escape because a window is cracked open.
Think of open windows as a tool, not a fix.
“If the wall looks fine, it is fine”
Paint hides a lot. Moisture trapped behind paint can quietly feed mold.
If you:
- Had water against a wall for hours
- See baseboards pulling away or swelling
- Notice the paint bubbling days later
Ask for a proper inspection. You are not being picky. You are just trying not to breathe mold in a small space where you sleep and study.
“I will get in trouble if I report this”
Sometimes students stay quiet because they are scared of fees, or because they are used to fixing dorm things quietly.
But ignoring a leak almost always costs more later, and sometimes that cost hits you, not just the building.
If in doubt, early honesty beats late surprises.
How this actually plays out: two short student stories
These are not dramatic movie scenes, just the kind of real, low-level chaos that happens in student housing.
Case 1: The laptop that survived
Alex lived in a small shared place near campus. One night, a pipe under the kitchen sink burst and sent clean water across the floor.
He:
- Shut off the water under the sink.
- Unplugged power strips and moved laptops to a bed.
- Took photos of the puddles and the pipe.
- Used every towel in the house to block water from reaching the hallway.
Landlord called a plumber, but Alex did the basic drying himself. His laptop bag was splashed but not soaked, and because he moved fast, nothing serious was ruined. He still had to wash half his wardrobe, but that beat losing his thesis draft.
Case 2: The mold that did not have to happen
Sam had a tiny basement room. After a big snow melt, water seeped through a hairline crack near the floor. The carpet got damp in one corner.
Sam put a chair over it and hoped it would dry.
Weeks later, the corner smelled bad, and a faint dark patch was on the wall. At that point, mold had already taken hold under the carpet.
Because there was no early report, the landlord argued that Sam had not said anything and shared repair costs. It turned into a tense, avoidable fight.
The difference between Alex and Sam was not luck. It was timing, photos, and just deciding to act instead of waiting.
Quick reference: Your student water damage response cheat sheet
If you like having a one-glance guide, you can treat this like a mental sticky note.
| Timeframe | What you do |
|---|---|
| First 10 minutes |
|
| First 60 minutes |
|
| First 24 hours |
|
| First week |
|
You cannot control when pipes break, but you can control how prepared you are and how fast you respond.
Common student questions about Salt Lake water damage repair
Do I really need renters insurance as a student?
If you own a laptop, a phone, some clothes, and maybe a bike or monitor, do the math. Replacing all of that out of pocket after water damage is rough.
Renters insurance is usually cheaper per month than a couple of fast food orders. It is not mandatory for your life, but it is logical if you rely heavily on your gear for school or side projects.
What if my roommate caused the water damage?
You still need to report it. They might feel embarrassed, but hiding it just risks more damage.
Your landlord or housing office will decide who is responsible under the lease. Your renters insurance cares about what was damaged, not who knocked over the bucket of mop water.
Try to focus on solving the problem together, not blaming each other in the moment. You can sort out responsibility later when people are not ankle deep in water.
How do I study or run my project if my room is unlivable for a bit?
You have more options than you think:
- Ask housing if there is a temporary room.
- Use campus spaces: library, labs, coworking areas.
- Store physical project pieces in a dry lab or makerspace if your room is noisy with fans and dryers.
If you explain the situation, many professors are flexible for a few days. The key is to tell them early, ideally with one or two photos attached so they see it is real.
Is it worth learning all this if this never happens to me?
You might get lucky and never see a flooded floor during your time in Salt Lake.
But someone on your floor, in your startup club, or in your group project will probably deal with it at some point. Being the person who knows what to do in that first chaotic hour is more useful than it sounds.
And here is a last question for you: if water started dripping from your ceiling tonight, would you know your first three moves without thinking, or would you freeze for five minutes trying to figure it out?


