I was staring at my dorm ceiling one night, listening to the AC run non-stop, and suddenly thought: how much money is literally leaking out through that thin layer between our rooms and the roof? A week later I was in a baking hot attic in Houston, sweating through my shirt, helping a student team test different ways to remove old insulation without wrecking the air quality in the rest of the house.
Here is the short version: safe and smart insulation removal in Houston comes down to three things: controlling dust, managing heat, and planning the project like a mini startup. You do not have to do everything yourself, but if you think through the process in steps, use the right gear, and borrow a few tricks from student makers and campus labs, you can save a lot of money and stress while keeping the house cooler and healthier. If you want a starting point on options and cost ranges, one student group I talked with kept going back to this resource on attic insulation Houston TX as their baseline.
Why students even care about insulation removal in Houston
Most students in Houston are not ripping insulation out of attics between midterms for fun. The conversation usually starts with something like:
– “My parents AC runs all day and the living room is still warm.”
– “We are renting a cheap house near campus and the air feels dusty and weird.”
– “We started a small energy-audit project and the data is just bad.”
Insulation removal shows up as a problem when:
– The old insulation is wet, moldy, or smells strange.
– There has been a roof leak or pest issue.
– Someone in the house has allergies and the attic is a suspect.
– You are upgrading to radiant barrier or better insulation.
– An energy audit shows big gaps or compression in the attic layer.
A few student founders in Houston told me that once they started doing simple home energy checks, attic insulation was often the messiest part of the puzzle. It is hidden, hot, and kind of gross. That also means it is where scrappy, careful thinking can help the most.
Insulation removal is not about “cleaning the attic.” It is about controlling air, heat, and particles so the rest of the house works better and feels safer.
The twist is that what works in cooler cities often fails in Houston. The summer heat, humidity, and long AC seasons change everything. You cannot just copy a YouTube tutorial from Minnesota and expect good results.
Houston-specific challenges students had to work around
When you read generic home guides, they rarely match what we see in a hot, humid city. The student teams I talked with kept running into the same Houston problems:
- Attics that hit extreme temperatures fast, often before noon
- Fiberglass and blown-in insulation that has shifted after years of AC vibration and roof work
- Short attic access points in older homes that make bagging and carrying things out slow
- Family schedules that only allow work in short bursts, usually early morning or late evening
- Budget limits that push people toward partial DIY instead of full-service contractors
So instead of a simple “hire someone and be done” answer, the conversation turned into: what can students and homeowners realistically do, where should they stop, and how do they avoid dumb mistakes that cause more damage than the original insulation?
One grad student put it in a way that stuck with me:
Think of your attic like a tiny lab. Every time you crawl up there, you are running an experiment with heat, dust, and air pressure. If you do not plan the experiment, the house becomes the test subject.
That mindset quietly shaped most of their tips.
Deciding if insulation removal is worth it in the first place
Before anyone grabbed a mask or ordered a vacuum, the smarter student groups did something very boring: they checked if removal was actually needed.
Quick checks you can do without tools
Walk through these basic questions first:
- Does anyone in the house smell a musty or “old dust” scent when the AC starts?
- Have you seen roof leaks, stains on the ceiling, or past water damage?
- Is there visible evidence of pests in the attic, like droppings or shredded material?
- Do rooms under the attic feel hotter or colder than the rest of the house?
- Has the insulation been moved, compressed, or stepped on during past work?
If you answer yes to more than one of these, a closer look is worth the sweat.
Simple measurements that student teams used
Student engineers are predictable: they want numbers. Some of the tools they used are cheap or even free to borrow:
- Infrared thermometer to check ceiling temperatures during hot afternoons
- Cheap humidity sensor to log attic humidity vs indoor humidity
- Thermal camera borrowed from a campus lab or local library, sometimes a phone add-on
- Basic particle meter to see how dusty the air gets when someone moves in the attic
One team logged attic temperature every 30 minutes on a summer day and matched it to AC runtime. They noticed a clear pattern: whenever the attic passed a certain temperature, the AC almost never cycled off. When they checked the insulation, much of it was thin, shifted, and in one corner, soaked.
Their rule of thumb: remove insulation only if it is damaged, contaminated, or so patchy that topping it up would not fix the real problem.
So the first “tip from student innovators” is something very unglamorous: do not remove insulation just because it is old. Remove it because you have a clear, measured reason.
Planning like a small startup: scope, budget, and roles
One thing that feels different on a student-focused site is that planning often looks like a group project. Friends, roommates, parents, a cousin who knows construction a little. It can get messy.
The teams that pulled this off without drama treated the project like a basic startup sprint.
Set the scope in one sentence
Write down exactly what you want to do this season. Not everything. One clear sentence.
Examples:
– “Remove the visible moldy insulation around the previous roof leak and seal that section.”
– “Clear all loose insulation from the attic floor so we can install radiant barrier and new batts.”
– “Vacuum the worst section where rodents nested last year, then let a contractor finish the rest.”
This keeps the goal realistic. It also helps you decide if you need professional help for part of the work.
Plan budget by zones, not just by square footage
Students who tried to price by “attic size” only often miscalculated. What mattered more was how hard each part was to reach.
A simple way they broke it down:
| Attic zone | Typical condition | Student-friendly approach |
|---|---|---|
| Near access hatch | Easy to reach, often trampled | Good for careful DIY removal and bagging |
| Middle open area | Deep insulation, some wiring | DIY only if walking paths are clear and joists visible |
| Far corners / low slopes | Very tight, hottest zones | Often better for pros with vacuum systems |
This zoned view helped them decide where students could safely help and where a contractor with proper gear was smarter.
Agree on roles before anyone climbs a ladder
It sounds silly, but a few groups told me their attic projects went smoother when they assigned roles like a lab:
– One person in the attic doing the actual removal.
– One person at the access point, bagging and taping.
– One person downstairs, watching for dust leaks, monitoring air quality, or just forcing water breaks.
When nobody knew who was responsible for what, things went sideways. Someone might kick insulation through a light fixture hole, or a mask would slip and no one noticed.
Safety lessons that came from trial and error
This part is where I noticed the strongest student fingerprint: lots of small experiments, some mistakes, and honest corrections.
Working with heat, not against it
The obvious problem: Houston attics are hot. But instead of just complaining, students tried to measure and work around that.
Several teams learned to:
- Check attic temperature before starting and stop work if it passed a self-set limit, like 110°F.
- Work in short shifts, often 20 minutes up, 20 minutes down.
- Schedule work during early mornings and late evenings only.
- Set up a household fan at the attic hatch to blow cooler indoor air upward.
One student tried wearing a fitness watch to keep track of heart rate. When it stayed high even during breaks, they stopped for the day. That kind of small, personal data point helped more than generic safety posters.
Dust control and DIY containment
Every attic project has one real enemy: fine dust that wanders into the living room. This is where some of the smarter “student hacker” ideas stood out.
They built simple containment setups with:
– Painter’s plastic around the attic hatch, taped to the ceiling.
– A cheap zipper door kit so people could go in and out without ripping the plastic.
– A box fan in a window, set to blow outside, often with a basic furnace filter taped to the intake side.
This is not as polished as a professional negative-air machine, but it cuts down the amount of dust that moves into the house.
Students also discovered:
The attic hatch is the weakest link. If you do nothing else, seal that opening with plastic and tape every time someone goes up to move insulation.
Simple change, huge difference.
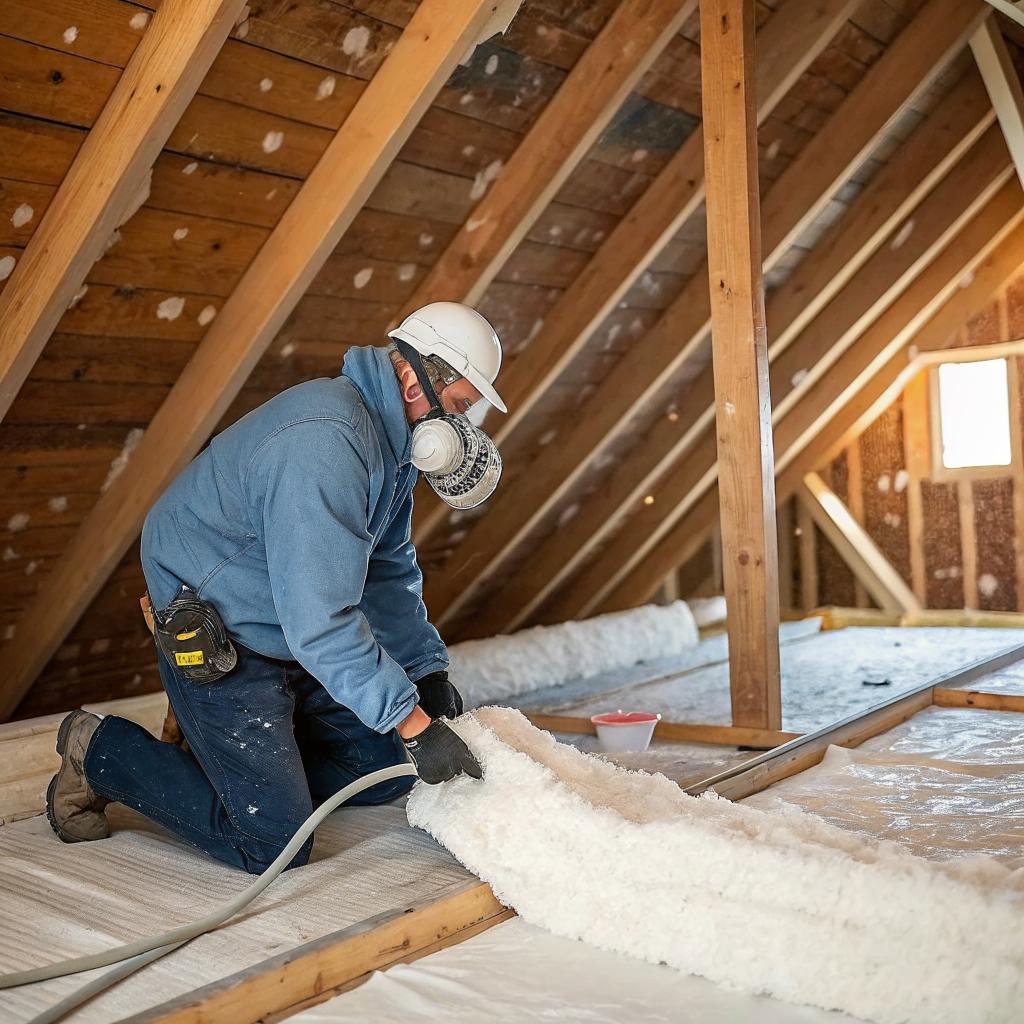
Personal protective gear that is actually realistic
You do not need a space suit, but you need more than a basic cloth mask.
Most student-led projects used:
- N95 or better respirators, fitted snugly
- Safety goggles that seal around the eyes
- Long sleeves and pants that you can wash right away
- Gloves that still let you grip bags and tools
- A simple headlamp, because juggling a flashlight and a trash bag is chaos
Some students went overboard at first with disposable coveralls, then realized they were overheating faster. They adjusted to lighter long-sleeve shirts and scheduled shorter shifts. There was a balance between protection and actually being able to function.
Techy tricks: sensors, tracking, and small experiments
Since this site is about students and startups, it feels honest to mention the nerdier side. Some of the best tips came from cheap sensors and basic experiments that any curious student could copy.
Using data to decide what to remove
Instead of guessing where the worst insulation was, student teams did things like:
– Place temperature loggers on different parts of the attic floor and compare readings.
– Mark “hot spots” on a printed floor plan of the house.
– Use a thermal camera to spot thin insulation areas over specific rooms.
They learned that the worst problem zones were not always where they expected. For example, one group’s living room felt hot, but the real issue was thin insulation over the nearby hallway where ducts ran. By targeting that area for removal and replacement, they got better results with less labor.
Tracking air quality before and after
A few groups borrowed cheap particle sensors before starting work. They measured:
– Baseline rooms before any attic disturbance.
– Levels when someone just walked in the attic without removal.
– Levels during real removal work.
– Levels a week or two after the project.
This tracking did two things:
1. It told them where their containment setup was weak.
2. It forced them to wait and confirm that the air really got better, not worse.
There was one awkward story where a team removed a small section of clearly moldy insulation, but did not seal the attic hatch very well. Indoor particle counts stayed high for days. They had to redo cleaning and filtering in the living room. That kind of honest failure taught them to take barriers and vacuuming seriously.
Student-tested methods for different insulation types
Not all insulation behaves the same way. Houston attics tend to have a mix of types, often layered by different owners over time.
Dealing with loose-fill (blown-in) insulation
Loose-fill is common and messy. Students tried three main approaches:
- Shovel and bag method
- Shop vacuum method
- Professional vacuum service for large areas
The shovel and bag method sounds primitive, but for small patches around leaks, it worked fine:
– Lay plywood or sturdy boards over joists for safe movement.
– Push loose insulation into small piles with a hand rake.
– Scoop it gently into heavy-duty contractor bags.
– Fill bags halfway so they stay liftable.
The shop vacuum experiments were more mixed. Household vacuums clogged quickly, overheated, or blew fine dust back into the attic. Some students tried pre-filters or inline buckets, but the performance still lagged. That is where many teams threw in the towel and called a contractor for full attic removal.
The final pattern:
For a few square feet of damaged loose-fill, careful hand removal works. For a whole attic of loose-fill, students kept ending up happier when a pro with a real vacuum system handled it.
Dealing with fiberglass batts and rolls
Fiberglass batts are easier to remove in theory, but they still shed tiny fibers.
Student methods that seemed to work:
- Roll each batt inward on itself as you lift it, so dust stays trapped.
- Place rolls directly into bags while still in the attic.
- Tape bags closed before lowering them through the hatch.
- Vacuum remaining dust off the attic floor or joists where possible.
Some students tried to reuse old fiberglass in other spots. That idea faded quickly once they handled it. The material was usually dusty, uneven, and sometimes mildly damp. Most decided to treat old fiberglass as waste, not something to recycle within the same house.
Spotting when material might need professional handling
A few warning signs pushed students to stop and get expert help:
– Insulation that looked discolored in unusual ways, beyond normal age.
– Very old homes where asbestos was a possibility.
– Strong chemical smells, not just musty or dusty scents.
– High levels of visible mold on wooden framing or sheathing.
No one wanted to turn a cost-saving project into a health problem. Students with environmental health backgrounds were often the first to tap out and say, “This part is above our pay grade.”
Choosing where students help and where pros take over
On a site about student projects and startups, it is tempting to pretend that DIY can beat professional crews every time. The reality from these Houston case studies was a bit more layered.
Where student effort made the biggest difference
Students were strongest in:
- Diagnostics: measuring, documenting, and figuring out where the real problems were.
- Planning: zoning the attic, labeling ducts, drawing simple maps for contractors.
- Small, targeted removal: cleaning up around known leaks or small pest areas.
- Post-project checks: verifying temperature drops and energy use after upgrades.
These activities added value without taking extreme physical risks.
Where professional help usually won
Professional crews had clear advantages in:
- Whole-attic removal of loose-fill material.
- Handling steep rooflines and tight corners.
- Dealing with any suspected hazardous materials.
- Coordinating removal with radiant barrier or new insulation installation in a single visit.
Students who tried full DIY on big, complex attics often ended up exhausted, behind schedule, or with patchy results. The more honest teams admitted that paying for serious removal for the hardest zones and doing detail work themselves was the most balanced path.
How student startup thinking shaped better attic projects
What makes this topic fit a “student, startups, campus trends” site is not just that people in hoodies climbed into attics. It is how they thought about the work.
Iteration instead of a one-time “big fix”
Students looked at attic projects in phases:
1. Observe and measure.
2. Test a small area.
3. Adjust methods and gear.
4. Expand to a larger zone.
This is basically the same loop as building a prototype app, just with more dust.
For example, one team in Houston started by removing insulation from a small, clearly damaged corner over a bathroom. They tested their containment setup there. After fixing leaks and installing new material, they monitored that bathroom’s comfort and humidity for two weeks. Only after seeing clear improvement did they commit to cleaning a larger portion of the attic using the same method.
Documentation that future owners actually understand
Students are used to writing lab reports, even if they complain about them. That habit carried into the attic.
They:
– Took photos before, during, and after each step.
– Marked dates of every change: removal, new insulation, radiant barrier, duct sealing.
– Created a simple attic map and taped it near the hatch.
This record helped everyone:
– Parents could reference it when talking with future contractors.
– Roommates understood what happened above their heads.
– If the house was sold later, the new owner gained context.
It is not glamorous, but it is the kind of quiet habit that separates a one-off project from a smart, long-term fix.
Small hacks that made work slightly less miserable
A few tricks from the student playbook that kept showing up:
- Bluetooth earbuds with one ear open, so people could talk between attic and living room.
- Using painter’s tape and index cards to label ducts and wiring paths before removal.
- Sharing a single cloud folder for photos, notes, and sensor data from the project.
- Pre-cutting plywood “stepping stones” to avoid missteps on bare drywall.
None of these ideas solve everything. But together they made the process feel more organized and less like a chaotic weekend chore.
Preparing the attic for what comes after removal
Removing insulation is not the end. It is the middle. What you do right after changes whether the house feels better or not.
Surface cleaning and sealing
Once old material is out, student teams did things like:
– Vacuum exposed surfaces with a HEPA-capable vacuum, where safe.
– Check for visible gaps between walls and attic floor and seal them with foam or caulk.
– Look for light leaking in from outside which often hints at unsealed openings.
– Inspect ducts for obvious leaks or crushed sections.
These steps are easier when you can see the attic floor clearly. That is one of the few true benefits of full removal.
Planning for radiant barrier and new insulation
Several Houston projects combined removal with upgrades, often to include radiant barrier or better insulation types.
The student point of view here was methodical:
– Compare performance claims with actual science, not marketing.
– Match materials to specific house conditions, not general trends.
– Think about future access for repairs and wiring.
They asked boring questions like:
– Will this new insulation make it harder to find future roof leaks?
– If we add radiant barrier on the roof deck, how does that affect attic ventilation?
– Can someone re-run wiring later without tearing everything up again?
Those questions are not trendy. They are practical, which in a way is more interesting.
What student innovators got right about Houston insulation removal
Looking across all these stories, a few patterns keep popping up that feel honest and grounded.
They treated “messy” as data, not failure
Projects did not go perfectly. Plastic sheets ripped. A bag of insulation tore at the bottom of the attic ladder. Someone forgot to tape a vent and dust came through.
Instead of hiding those slip-ups, students noted them and changed their setups. That mindset might be the biggest differentiator between a stressed homeowner and a student team. Mistakes were expected and used to refine the next step.
They accepted that partial progress is still progress
There was no pressure to turn every attic into a perfect case study. Some groups only tackled one damaged corner that had a history of leaks. Others focused on a strip near the attic hatch to improve access for future work.
The nice surprise was that even partial removal and upgrade work sometimes delivered real benefits:
– A cooler bedroom under the worst attic zone.
– Less dust triggered when the AC cycled.
– Clearer access paths for electricians and HVAC techs.
Perfection would have cost more money and time than anyone had. Realistic gains felt more human and more repeatable.
They involved more eyes and more questions
Student teams often had a mix of backgrounds: mechanical engineering, public health, architecture, business. That mix led to questions a single homeowner might not think to ask.
For example:
– “If we change attic conditions, does that affect how fast the roof materials age?”
– “Are we moving dust into ductwork that will circulate later?”
– “How will this show up on an energy bill six months from now, not just tomorrow?”
Some of these questions stayed half-answered. But raising them kept people from oversimplifying the project into “old bad, new good.”
Q & A: Common Houston attic questions students kept hearing
Q: Is it worth trying insulation removal as a student project, or should I always call a contractor?
A: It depends on scope and condition. If you are dealing with a small, clear problem like a water-damaged patch around one leak, and the material does not look suspicious or hazardous, a careful, well-planned student-led effort can work. For whole-attic loose-fill removal, complex rooflines, or possible contaminants, paying for proper equipment and experienced labor is usually the smarter move.
Q: How do I know if my containment and dust control setup is strong enough?
A: A simple test helps. Before full removal, send someone to gently disturb insulation in a small attic section while another person stays in the main living area with a white cloth or tissue near vents and doors. If you see visible dust collecting or smell attic air quickly, your barriers are weak. Adjust plastic, tape gaps more carefully, and consider adding a window exhaust fan before scaling up.
Q: What is the most “student-like” improvement I can make without touching the insulation?
A: Mapping and measurement. Borrow or rent a thermal camera, walk your house on a hot afternoon, and mark the warmest ceilings. Check attic temperature and humidity at the same time. Draw a basic attic floor map that matches rooms below. That exercise alone often reveals where any future removal or upgrade work would pay off most. It also arms you with better questions for contractors if you go that route.
Q: If I only have one weekend free, what should I prioritize?
A: Focus on the intersection of “safest” and “highest impact.” For most people, that means:
1) Improve access and walking paths in the attic.
2) Clean and organize around the hatch.
3) Remove clearly ruined insulation in one limited area, like a past leak zone.
4) Seal any visible gaps between conditioned space and attic floor.
That limited scope keeps the project realistic while leaving the door open for better upgrades later, either DIY or with professional help.
What part of your attic story feels most confusing right now: the science, the safety, or just figuring out where to start?


